Or it can be.

Baking has always been something I have been passionate about. I also enjoy cooking. No, I am not a professional chef or baker, as you will probably see in my dishes; they aren't always the prettiest of things. I do love cooking though, and because of my family I tend to cook low calorie dishes, but I warn you, some do go out there in the calorie zone. I will post yummy recipes I make along with pictures here. I warn you I do like spicy food, so sometimes they will be a little spicy, but I will let you sometimes choose how spicy the meal is. Anywho enjoy.

Tuesday, September 16, 2014

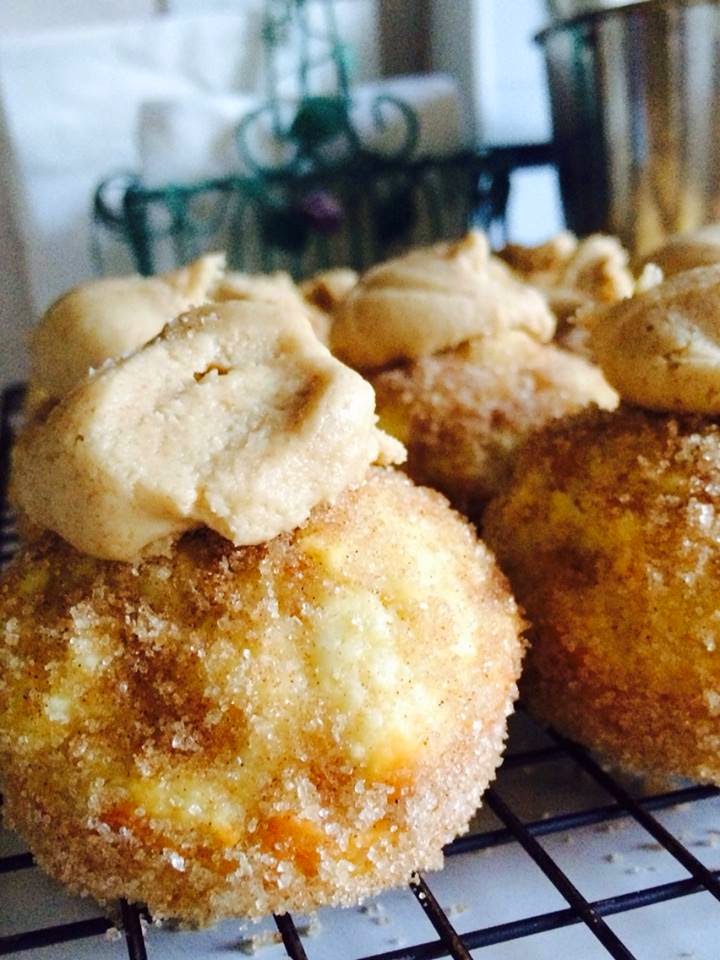
Snickerdoodle Cupcakes with Brown Butter cream Frosting

Hello everyone out there. It has been a while since I posted. I know I said that last time too, but college life is busy and when it is hot outside you do not want to bake and make the house even hotter.  I did bake this last weekend  for the girls on my floor though and these cupcakes were a hit!  If you have never made brown butter before, it is easy and gives almost a caramel like flavor to what you add it to. This was my first time playing with it and I highly recommend it. These cupcakes start out with a basic cake recipe, but the process after they come out of the oven is what makes them so addicting.  When you make them in mini cupcake tins they are like poppable doughnuts, and who doesn't like doughnuts? 

This recipe makes about 3 dozen mini cupcakes or about a 15 regular sized ones.

What you will need: 
The Cake:
3/4 cup butter, softened     
3/4 cup sugar
2 eggs
 1 tsp vanilla extract
1 TBS Baking powder
1 tsp salt
3 cups flour
3/4 cup milk 

The Coating 
2 cups sugar
2 TBS cinnamon
1 stick butter

The Frosting 
1 stick butter
1 cup powdered sugar
1 tsp  vanilla extract
1 TBS milk

What to do:


Preheat oven to 350F

1. Beat together sugar and butter until fluffy
2. Add eggs in one at a time until just incorporated
3. Add Vanilla
4. In a separate bowl sift together flour, baking powder, and salt
5. Alternate adding a third dry mix of ingredients with a  third of the milk to egg mixture, mixing in between, until all of the flour mixture and milk have been incorporated.
6.  In a well greased cupcake tin fill each tin about 3/4 full and bake for 12-15 minutes for mini cupcakes. 15-20 for average size.
7. While the cupcakes are in the oven melt one and a half sticks of butter over the stove, let sit until it starts to bubble, then stir constantly until lightly browned, and pour into a bowl. If you are going to make the frosting you can combine all the butter at this point.
8. Combine cinnamon and sugar onto long plate or wide bowl
9. Once cupcakes are out of the oven and cool enough to handle coat each side with melted  brown butter,  then roll in cinnamon sugar mixture.

If you decide to have the frosting...Which you should.
 
1. Brown your butter if your haven't already and let cool to room temperature.
2. Combine powdered sugar, butter, and vanilla. If needed add one tablespoon of milk at a time until you reach desired consistency.
3. Frost cupcakes once they are cooled.

Like I said, these are pretty dang tasty. You should try them.

Saturday, April 26, 2014

Brownie cookies...or Crownies...Brookies?

Hey people, so it has been a while since I have been able to post anything on here. That is what college life is like I suppose. I was having an off day and so I decided I would bake something, the only problem was I was out or running low of a few things that are essential to baking, so I went to the store and just bought brownie mix (I am a poor college student and I was desperate for chocolate! I couldn't afford making them from scratch!), but then I thought...why not make these a little different?  People had been asking all week what I would bake next (I am known for baking) and many asked for cookies and others brownies, so I made a brownie in the form of a cookie!

Anyone can make these and they are done in a half hour. They combine the chocolatey wonder of a brownies, with the ease  of eating and nice look of a cookie.  I usually get frustrated when I need to cut my brownies and they don't look nice, so these are a great alternative. It is also easier to serve for multiple people.

With this recipe I made a little over two dozen crownies...brookies...You know what I mean.  


What you will need: 

1 box of brownie mix 
2 eggs 
1/4 cup vegetable oil
1/4 cup all purpose flour
3 TBS  water 
1/2 cup semisweet chocolate chips


 What you will do:


1. Preheat over to 350F

2. COMBINE EVERYTHING.   Yeah it's that easy. Just stir it all together. Ff the batter still is pretty thin you can add a little more flour so it is more dough-like.

3. Spoon batter, about two tablespoons, onto greased cookie sheet

4. Bake for 9-11 minutes (nine if you like them gooier inside), leave them to cool o the baking sheet for two minutes after removing, and then move to wire rack. 

It is that easy! I hope you all enjoy! If you try this recipe out please let me know how you liked them.

Monday, August 5, 2013

20 minute no bake cheesecake with raspberry sauce.

My goodness it has been a while since I have been able to post anything on here. You know how it is though with work and school; they take over your life. I will be moving into my dorm rooms soon so I decided I wanted to put something up.  I was actually thinking about it for a while, but I wasn't sure what I wanted to make.  It is sunny and hot, even here in the Seattle area, so I didn't want to have to use the oven.  After a while of thinking and pinterest looking my mom actually showed me this recipe. It looked great, and it didn't involve having an oven, if you take the sauce off you don't even need the stove and could be made in a dorm room!  Try this out, I am sure you will love it! My dad did and he doesn't even like cheesecake! This recipe makes four servings.


What You Will Need

For the Graham Cracker 
Crust:                                                           

1 cup graham cracker crumbs
2 TBS brown sugar
2 TBS melted butter
1 1/2  Tsp. ground cinnamon

The Cheesecake 
8 oz softened Cream cheese.
2/3 cup powdered sugar
1 cup heavy whipping cream
1 tsp vanilla
1/2 tsp corn syrup                                 

Raspberry sauce
2 cups raspberries
1/3 cup water
1 1/2 tsp corn starch
2 TBS sugar
2 tsp lime juice


How To Make It:

To make things easy on yourself I would suggest making each thing separately and then once everything is done you can assemble it together.


The Graham Cracker Crust

1. Combine cracker crumbs, cinnamon, and brown sugar in a small bowl.
2. Stir in melted butter until a small crumble forms
3. store in fridge until ready to assemble dessert.


Cheesecake

1. Pour whipped cream in a mixing bowl and whip on high until soft peaks form. About two to three minutes
2. Add syrup to whipped cream and mix for another two minutes on high.
3. In a separate bowl combine cheesecake, powdered sugar, and vanilla. Mix on High until smooth.
4.  Fold in half of the whipped cream into   the cream cheese mixture. After well combined fold in the other half and store in fridge until ready to assemble.


Raspberry Sauce.

1.  Combine corn starch and sugar and then mix in water.
2. Add raspberries and heat on medium high heat until the sauce begins to boil stirring frequently.  Once it boils stir constantly for  five minutes.
3. Run sauce through fine mesh strainer to remove the seeds.

Assembly

Separate the graham cracker crust crumble to the bottom of four small bowls, spoon...or if you want it to look fancy pipe in, the cheesecake mixture. Finish it off with the sauce.

As a side note, if you want to you can use the rest of the heavy whipping cream to make whipped cream to have with it. It is easy!  Just add two tablespoons of sugar with the cream and whip until peaks form. I hope you all enjoy this!

Wednesday, April 17, 2013

Miso-Maple glazed Sweet Potato Tacos with Cilantro-lime sauce

My goodness gracious what a mouthful that was!  So, recently I was perusing Pinterest, and amazing place for people like me, or anyone really, they have everything there.  I was looking in my favorite section, the food section and I saw these tacos.  After exploring my pantry and fridge I found that I  had most the things that I needed to make them except for a few items I could easily pick up on my drive home from my classes.  This dish is full of favor and very low calorie. It is what I like to call a Mexiasian taco!  I urge you to try this in all of its deliciousness!  Seriously, it was tasted great enough my dad didn't even notice there was no meat!

When I made this there was enough to make nine tacos

What You Need

Corn Tortillas, estimate 2 to 3 tacos a person

The Glaze
2 TBS white Miso Paste
2 TBS Maple Syrup
2 TBS Rice Wine Vinegar
1 TBS red pepper flakes
5 Small Sweet potatoes, diced into one inch cubes
1 red onion sliced 1/4 inch thick
Olive Oil

The Sauce
1/2 bunch of Cilatro without the stems
3 scallions, chopped
1 lime ( the zest and half the juice)
3 small garlic cloves
1 tsp Siracha

Garnish (addition toppings) for Tacos 
Cilantro
Scallions, diced
pine nuts
Savory cabbage 

Directions 

1. Preheat oven to 400F
2. Wisk together miso paste, maple syrup, rice  vinegar, and red pepper flakes.
3. Place potatoes and onion in a shallow baking dish and gently drizzle olive oil over it. (I suggest two different dishes)
4. Brush glaze over potatoes and onions.
5. Bake for 20-30 minutes, keeping a close eye on onions. If they cook to fast take them out early.
6.  In a blender  add all the sauce ingredients and mix for five seconds

When potatoes are done I recommend heating tortillas on stove,  Then place potatoes and onion on tortilla, spoon on some on some sauce, and place the toppings (garnishes)  you desire on top. 


Sunday, April 14, 2013

Quinoa stuffed bell peppers

My goodness, it feels like forever since I had had the chance to cook or bake anything new. With school, work, church, and preparing foe my move to the university I will be attending in the fall my time has been limited, but I suppose that was a blessing in disguise. With the limited time I discovered a new dish that is easy to make and delicious. The best part is it can be changed up in different ways with whatever you have in the house to make an entirely different flare for a meal.  I made this one with a southwestern feel.

This makes enough for three servings, but if you have a large appetite, I recommend either doubling the recipe, or using this as a side or appetizer.

What You Will Need
 
3 Bell Peppers (Any color will work really)
1/2 cup Quinoa
1 TBS cumin
1 TBS red pepper flakes
1 can black beans
1 4oz can jalapenos
1/2 yellow onion diced
1/4 cup cilantro chopped
1 TBS cooking oil of any kind
Pepper jack cheese, as much or as little as you like
Salt and pepper to taste

Directions
1. Preheat oven to 350F

2.  Simmer the Quinoa in water for twenty minutes or until tender. Drain the remaining water out.

3. Stir chopped cilantro, red pepper flakes, and cumin to quinoa.

4.   Heat oil in a medium sized frying pan and saute onions and jalapenos, when the onions are tender add them and the jalapenos to the quinoa.

5. Drain and cook the black beans over medium heat for five minutes, stirring occasionally, then add to quinoa. Add salt and pepper to taste.

6. Cut the tops off the bell peppers and remove seeds before filling each with the Quinoa mixture.

7. Fill a pan with one inch of water and place Bell peppers in standing up.

8. Cook for five minutes, add cheese and put back in oven until the cheese melts. 


I hope you try this dish and enjoy it as much as I did!

Tuesday, January 1, 2013

Baked Jalapeno Poppers

So, when I initially started this blog I thought it would be full of all healthy  stuff, but that hasn't happened too often because I mainly bake and baking healthy is hard unless you use artificial sweeteners, which I am not a fan of, if you are, it is fine, but me, I don't like the after taste, but these are a step in the right direction, sort of.  These jalapeno poppers are baked rather than fried so that saves few hundred calories.  I made these for a new years party that I went to and everyone loved them . They have a kick to them, but how can they not when I make them? The heat, however, isn't too overpowering. I hope that you try them and love them.  They use wonton wrappers and before you go to four different stores like I did let me tell you wonton wrappers are not in the Asian food section! They are in the produce aisle near the tofu.

Oh and if you have friends like mine who are MAJOR spice wimps (Love you Sonya and Tobi)  I suggest switching the jalapenos for a half cup of bacon bits for bacon poppers!

Now here is the recipe. I hope you enjoy.

What you need.

1 package of wonton wrappers.
4oz  dice jalapenos (I used picked )
1  cup hot pepper blend shredded cheese.
8 oz cream cheese

How you make them.

1. preheat of to 375F
2. Combine jalapenos and cheeses. I recommend using a stand mixer or hand mixer to make it easier.
3.  Put a tablespoon of the mixture into the center of the wonton and wet the edges of the wonton  with a small amount of water and fold in half so it is in the shape of a triangle.
4. Bake 10-15 minutes.
5. Enjoy!


Monday, November 26, 2012

Apple Cinnamon Roll Cupcakes


To start I have to say that pinterest is pretty awesome. I didn't do it for a while thinking it  as no different than any other of those media sites, but I checked it out after some urging from my amazing mother and I saw some pretty awesome stuff. I always like to look at the food stuff, and then I saw a picture of these apple cinnamon roll things, and I was drawn in! I tried making them and they turned out awesome! I highly recommend trying them! Oh and WARNING! THEY ARE STICKY!

Edit: I made these recently will bourbon soaked raisins and that made them even better!  So if you would like to do that add raisins that have been soaked in a third cup of bourbon for forty minutes.  Then have a cream cheese frosting with three tablespoon of reduced bourbon mixed in it.

What you need:

The Dough:

2 cups of milk (I used fat free)
1 packet active dry yeast.
2 teaspoon salt
1/3 cup white sugar
6 1/2 cups flour sifted (Plus a little more))
2 eggs
1/4 cup butter unsalted, at room temp.
Cooking Spray

The Filling:

2 cups peeled and thinly chopped apples. (I used granny smiths)
1 cup sugar
1 cup brown sugar
 4 TBS cinnamon
1/4 teaspoon ground cloves
1/4 teaspoon ground nutmeg
1/4 cup melted butter, unsalted
1/8 teaspoon salt

What You Do:

1. Preheat over to 350F 
2.  Start heating the milk  in a saucepan until it is 110 degrees
3.  Combine sugar and yeast and hot milk in a stand mixer
4.  Add salt and 2 1/2 cups flour to bowl  and mix for two minutes
5. Add eggs and 1/4 cup softened butter
6.  Add remaining flour half cup at a time. Wait until the previous  addition is fully incorporated before adding the next.
 7.  Remove from bowl or use dough hook and kneed for five minutes, or until it is smooth. Then put back and bowl that has been sprayed with cooking spray, turn over dough once so it is thinly covered with the oil, ans cover with towel and leave to rise for 40+ minutes.

While it is rising!

8. Combines sugars and spices for filling and stir with apples
9. Roll out dough on flowered counter  top into a rectangle about 1/4 inch in thickness and brush with melted butter leave a 1/4 inch  boarder at the ends with no butter
10.  Add cinnamon apple mixture evenly over dough and roll up tight and cut into 24 even pieces and place in cupcake tin with liners.
11. Leave to rise 30 min and brush rest of butter over them
12. Bake 20-30 minutes, or until tops are golden

When they are done let them cool and then add glaze.  If you need a recipe try this one.

1 cup powdered sugar
2 tbs milk

1 Stir to combine.


Thursday, September 27, 2012

Lemon Zucchini Bread

Well not too long ago a friend of my moms gave her two massive zucchinis that he had grown, and we were not quite sure what to do with them. The first one we managed to use just by using in out sauteed veggies, but we wanted to get a little creative. After a little searching an a lot of pinterest we came up with the idea of a zucchini bread  with a lemon glaze. This thing went fast! It is great for breakfast or a late nigh snack. I hope you try it an like it as well.

What You Need:
The Bread
1 1/2 cup shredded zucchini (I just used a cheese grater with the raw zucchini)
2 cups  flour
1/2 teaspoon salt
2 tsp baking powder
1 eggs
 2 medium lemons
1/2 cup vegetable oil
1/2 cup buttermilk
2/3 cup sugar

The Glaze
1 cup powdered sugar
1 lemon

What You Do:

The Bread
1. Preheat oven to 350F
2. Combine flour, baking powder, and salt in a large bowl
3. In a small bowl combine eggs and sugar, beat until combined
4. Add vegetable oil, buttermilk, the juice and zest of one lemon to the egg mixture and mix well.
5  Add the wet mixture to the dry  and mix together and then fold in zucchini.
6.  Pour in  to an 8x4 loaf pan and bake 45 to 50 minutes or until a knife can be inserted in the middle and come out clean.
7. After bread cools pour on glaze.

The Glaze
 1. Combine juice of the lemon and powdered sugar and stir.
  
All that is left is to enjoy!


Thursday, September 6, 2012

Baked Penne

A few days ago I went to a girl friend's of mine. At first I was only going to show her an idea I had for miniature chocolate cream pies, but then I thought, why not I will make dinner too!  So I did it! I made dinner for her, her husband, and their baby who is the most adorable, expressive baby, in the world!  Now this dish can be as nice or as complicated as you wish. You can make your own sauce or break out the prego, classico, or  your whatever favorite store bought spaghetti sauce is. I myself made my own and I have the concoction of spices I used below.  And just because I can I will dedicate this little recipe to the wonderful Sonya, Charley, and baby Arianna.

Oh and this serves 4 to six depending on how big a serving each person has. 

What You Need:

24 oz. spaghetti sauce (OR make the one I have below))
1 lb ground turkey (OR other meat))
3 cups penne pasta
1 cup cremini mushrooms sliced thin (opt.)
1 cup mozzarella (or more if you are a cheese lover)
2 TBS dried parsley ( 4 TBS fresh)

How to Make it

1. preheat over to 350F
2. Boil water in a large pot. Enough water so when past is added the water will be about an inch over the pasta while waiting for water to boil and pasta to be done add meat.
3. Cook meat in a ten inch pan until browned and then add the sauce to it.
4. combine Pasta and meat sauce.
5. Pour half pasta in a 9x9 dish.
6. layer the top with the mushrooms, and then cover with remaining pasta.
7. Top with Mozzarella and parsley and bake until cheese melts 

The Tomato sauce:

What you need


1 24 oz can crushed tomatoes
3 TBS Italian seasoning
2 TBS dried onions (You can use fresh if you want)
4 TBS Garlic powder
1 tsp salt
1 1/2 black pepper
1 dash paprika
1 dash oregano
1 sash dried parsley
Oh and add about a TBS or two of water from the water the pasta boils in.

How to make it

1. Combine ingredients in sauce pan over medium heat and stir occasionally.  The longer you cook it the better the flavor of the sauce. I did mine about fifteen minutes because of how time went, but you can do your longer if you want.


Saturday, September 1, 2012

Blubbering Blueberry Pie

Now why have I called this blubbering? I do not rightfully know....because you will cry it is so good maybe? I want to say yes, but really is because I just thought the name sounded cute.  Now I know this is two pies in a row, but when I found out my parents were going to my grandparents I decided I wanted to make my grandpa a pie. HE really likes pies, and at first I was going to make him a custard pie. The last time I made it he really liked it, but when I opened my fridge I found I had used the last of my eggs a couple days earlier when I made the banana cream pie.  So, I though a fruity pie, but then we had  only two apples, and no strawberries, but we did have a nice big bag of frozen blueberries! Now I would like to note you can use fresh berries in this pie. I just used frozen because it is what I had.

Here is what you will need:

The pastry for a two crust nine inch pie (NOT PREBAKED!)
1/3 cup of sugar
1/3 cup all purpose flour
3/4  teaspoon  ground cinnimon
1 1/2 teaspoon lemon juice
1/8 teaspoon lemon zest
4 1/4 cup of blueberries (if frozen partially thawed )
1 TBS  butter(melted)

What you have to do:

1. Preheat oven to 425F and ling the bottom of your pie pan with half of the pastry.
2.  Combine sugar, flour, blueberries, cinnamon, lemon, and lemon zest.
3. Pour the berries into the prepared pie pan.
4: Lay the half of the pie pastry on top of the pie pan  and crimp the sides to the bottom and top pastries attach. C t slits into the top pastry.
5. Brush top of pie and corners with melted butter, then wrap edges in foil.
6. Bake  thirty minutes, then remove aluminum foil and bake  ten to fifteen minutes longer.

And here is the final product. 


Friday, August 31, 2012

Banana Cream Pie

Well I have been planning on making this pie for a little while. You see my Youth pastor was leaving and so me and another leader decided to put something together to say good bye for him. We made a card for him,  we had a hat and put little inside jokes all over it using little pins....One was a parrot. We wanted one other thing too though.  I was going to make him  the chocolate cake I have on here, but then I found out he didn't like cake,  but his daughter told me he loved banana cream pie, and so I thought, hey I can do that! And so I did, and everyone liked it! Even someone who didn't like bananas all too much. I hope you get similar reviews if you make this.  I adapted the recipe from one I found in a really old betty crocker book.

Here is what you are going to need!

1 baked nine inch pie crust
2/3 cup sugar
1/4 cup cornstarch
1/2 teaspoon salt
3 1/3 cups whole milk
4 egg yokes
3 tablespoons of butter
2 teaspoons vanilla extract
1 teaspoon banana extract
1 large banana, diced into quarter inch slices

Oh and if you want you can reserve  the egg whites and make a meringue to top the pie.

How to do it:

1. combine the dry ingredients in a sauce pan and add milk slowly over medium heat. Stirring constantly. Seriously stir constantly or it will burn.
2. When mixture thickens and boils add  half the mixture slowly to the egg yokes stirring constantly still (You don't want to cook the egg yokes)
3. Add the egg mixture to the sauce pan again and bring back to a boil for one minute.
4. Remove from hear and add butter, banana extract, and vanilla extract.
5. Line bottom  of pie crust with banana so that there is almost not crust visible at bottom of pan, if need be add another.
6. Pour mixture over the bananas and the put plastic wrap on pie, carefully pressing down on the mixture. (This prevents the filling from getting a pudding skin)
7. Refrigerate for two hours and then serve with whipped cream.


Tuesday, August 21, 2012

Coconut Carrot Cookies

Do not let the name throw you! Seriously just don't.  I know I know the name sounds weird and coconut and carrots seem like a very odd combinations and coming along the recipe I adapted this one from  I was a little thrown off myself, but I thought, "Eh why not? I have carrots that are going to go bad if I don't use them soon, and I love coconut! I will make these cookies and pray they are yummy." Guess what! They were! The original recipe called for the cookies to be  topped with frosting, an I decided not to do so because I thought it may add too much. You can add it if you so choose though. These cookies have a subtle sweetness to them.  I hope you enjoy them.

The way I made the cookies they had 140 calories  calories and there were 26 cookies total.

Now here is what you will need: 

 1 cup mashed carrots (This is about 2 large carrots))
3/4 cup sugar
1 cup shortening
2 eggs
2 teaspoons vanilla extract 
1 3/4 cup flour
2 teaspoons baking powder
1/2 teaspoon salt
3/4 cup shredded coconut

How I mashed my carrots was I just steamed them until they were soft and then put them in a food processor then let them cool.

Now what you will do

1. preheat the over to 400F
2. mix carrots, sugar, shortening, vanilla, and eggs together
3. Stir in flour, salt, and baking powder
4. Stir in coconut
5. Drop  cookies  onto sheet about a couple TBS full. ((I use the medium sized pampered chef scooper)) and bake  ten minutes.

And this is your final product!


Saturday, August 18, 2012

Baked Potato Salad. Fully loaded!

Well today I had a picnic to go and I knew what everyone else was bringing, sorta, and I realized there was no potato salad, and so I figured, why not?  I knew, however, potato salad is one of those things that some people like and some don't, and I wanted something I thought everyone would like.  I cut out the usual stuff, well other than the potatoes, and made what  I thought everyone would like.  This dish has bacon and cheese in. I just gotta say that little tidbit is what made my friend Tobi smile and exclaim her belief of my beauty. I hope your friends exclaim the same.  You are all beautiful! And I hope you love this dish. Oh and please note this was made for a group of about  six people.

You can add more or less bacon or cheese depending on your preference .

What you will need:

3 large russet potatoes
1/2 cup Mexican style sour cream
1/2 cup of Mayonnaise
3/4 cup bacon bits ( or you can cook your own bacon and crumble it. I would say 6-8 slices would work)
3/4 cup shredded sharp cheddar cheese
3 green onions  slices cut about a quarter  of an inch, ((Only the green part))
1/2 teaspoon pepper
1/2 teaspoon celery seed
1/2 teaspoon garlic powder
1 dash of Cayenne pepper
1 TBS chopped parley

How to make it:

1:  Peel potatoes, wrap in foil, and bake at 350F for 1.5 hours. After they are done let them cool and cut into half inch pieces.
2: As potatoes are  baking combine the rest of the ingredients in a medium sized bowl and when potatoes are cooled add them,.
3: Refrigerated until ready to serve


Saturday, August 11, 2012

Brownies

IT had to happen. Brownies had to be here. Now normally I am not a huge chocolate person. I know. SHOCKER! I mean I am a woman I must love chocolate right? Well, eh I am more spicy than sweet I guess, but I do like brownies. They are a quick and easy dessert. I have made these a few times and people asked for the recipe and so I just put this out here now.  I hope you try this and like them.

What you need

1/2 cup of veggie oil
1 cup white sugar
1 teaspoon vanilla extract
2 eggs
1/2 cup flour
1/3 cup unsweetened cocoa powder
1/4 teaspoon salt
1/3 cup chocolate chips
1/4 cup white chocolate (optional)
1/4 cup chopped walnuts (optional)

Here is what you do

1. preheat oven to 350F
2. in a medium bowl mix together everything but the chocolate chips, white chocolate chips, and walnuts.
3.   fold in the chocolate chips, and then the optional ingredients.
4. Pour the batter into a well greased eight by eight dish and make 20 to 25 minutes


Tortilla Soup

I am Mexican and  grew up have Mexican food at least once a week so it is no surprise that it is my favorite kind of food.  Unfortunately much of it is high calorie and I have two calorie conscious parents, and so when I found a tortilla soup recipe  that was also low calorie I was so excited!  This recipe is super easy.

The entire pot will be 1200 calories  so you can decide on that how many servings to have.

What you will need.

1 lb ground turkey. (Or, like me, you can use your turkey leftovers from Thanksgiving)
1 TBS olive oil
4 garlic cloves
1 onion
1 28oz can of diced tomatoes
1 can  sweet corn
 1 can drained and rinsed black beans
2 seranno peppers diced
quarter cup of taco seasoning
Tortilla chips
grated cheese

How to make it:

1. Heat olive oil in a large  pan or pot and brown turkey.
2. Add the onions and garlic.
3. Once onions are translucent add everything else. (( if you want it soupier you can add more water))
4.  simmer for thirty minutes and enjoy  topped with grated cheese and tortilla chips.

See I told you it was easy! And this is the yummy final product.


Cuban Pork Shoulder Sandwich

Now, I am a girl who likes all different kinds of flavors. There is  very little that I do not like, and so I recently tried out a little restaurant here in Seattle called Paseo. Let me tell you they were amazing!  They apparently have the fourth best sandwich in the country! Well I unfortunately do not live within walking distance to this little hole in the wall and so I decided to set out and find a recipe that could be similar to it, and I think I have done it. Now, it is not exact, but similar, and I hope you all enjoy it!

Oh and for those of you who do not like onions I beg of you to put them on the sandwich. The onion flavor is not intense and I think the caramelized onions make this dish.

I made this to serve three but had enough left overs for two more sandwiches. 

So here is what you will need:

Marinade
1 Pork Shoulder ( mine was 2.5 lbs)
15 garlic cloves
1 tsp salt
1/2 onion
2 teaspoons ground oregano
1 cup Orange juice
1/4 cup lemon juice
1/4 cup  lime juice
3/4 cup olive oil.

For the assembly:
Bread (I used the Costco  torta sandwich rolls)
Caramelized onions (Recipe is below)
Mayo (My folks used dijonnaise and thought it worked. It may work for you other calorie conscious people)
picked jalapenos 
Romain leaves
Fresh cilantro leaves

Caramelized onions:
1 Onion
1 TBS oliveoil
1 tsp salt
1 tbs sugar

Now for how to do it

1. In a food processor (If you don't have one a blender will work)  pulse the salt and garlic together.
2.  Chop up onion and pulse it with the salt garlic mixture.
3. Add the juices and oregano and pulse again
4. heat the olive oil on the stove and then add the garlic mixture.
4.5 heat the sauce through.
5. Put the pork shoulder in a bowl and poke holes all thorough it, with a knife or fork, on all sides.
6. Pour the marinade  over the meat.  Cover and refrigerate for 4 hours or  over night.

The next park can be done in a  crockpot or an oven. I did it in the oven.

7. Preheat the oven to  325F
8.  Cook the meat uncovered for one hour per pound of the meat and then add a half hour.  ((Basically cook until it can shred easy))
9. Let the meat rest on a cutting board for ten minutes then cut the fat off and shred it up.
10. Drain the fat from the dish you cooked the meat in and them pour the yummy juices into a large pan, and add the meat with a half cup of water and  bring to a simmer. cook for ten minutes.

As the meat is simmering you can  caramelize the onions,

How you do it:

1: Warm olive oil over medium high heat.
2. As the olive oil heats cut the onion up into half moon about a  quarter inch to a half inch in width.
3. Sautee the onions in the olive oil and add salt and sugar until onion reduces and  turn to a light brown color.

Now you can assemble the sandwich!
I recommend toasting the bread in oven  for maximum deliciousness.

And this is your final product!


Thursday, June 21, 2012

German Apple Cake

I made this cake not too long ago and it was so great! You see my mom isn't a  big fan of fruit pies, and for me it is hit an miss, ya know it all depends on the crust if the crust isn't great the pie isn't, but this cake filled with fruit hits the spot! Even my mom liked it. The cake is topped with strudel and I recommend trying it out, It really isn't too much work. Especially if you have an apple peeler/ slicer.  Eat it warm with a nice scoop of ice cream for absolute deiciousness.

Oh and part of this does need to chill for a half hour, so just a warning


What You Will Need.

For the Strudel

1 cup flour
1/2 cup brown sugar
2 tsp ground cinnamon
6 TBS butter diced

How To Make It.

The Strudel: 

1. Put all the ingredients in a bowl
2.  use your hands to  combine all ingredients into a crumble dough ball.
3.  Wrap the dough in a ball and  twist the ball tight.
4. Store in fridge for a half hour.


What You Will Need

For the Cake

12TBS softened butter
1 cup brown sugar
zest of one lemon
3 large eggs
1 1/4 cup flour
1 tsp baking powder
1/2 tsp salt
3 TBS milk
2 apples, peeled, cored and cut into slim wedges.
((For this I just used an apple peeler/ corer contraption.  It does it all for you! IT even thing slices the apples for you. It is pretty awesome.))

How to Make It.

The Cake:

1. Preheat over to 375 F
2. Grease up your  9x9 cake pan
3. cream the butter with the sugar with an electric mixer
4. Add the lemon Zest
5. Beat ion the eggs one at a time. Wait until previous egg is completely  dissolved before adding another
6. sift the dry ingredients together and then add to the batter.
7. Add in the milk and stir in with a fork or spatula. 
8. pour half the batter into the pan and spread evenly.
9: arrange half the apples over the batter covering completly
10. Put the rest of the batter over the apples and again spread evenly. Put the rest of the apples over  the batter.
11: Take out the strudel  fridge and grate. After pour  the apples
12: Bake in center rack of over for 50-60 minutes. When taking it out insert a skewer and if it comes out clean you are good! If not.....five more minutes then try testing it again. Then you are good.

And once again here is that little beauty.


Tuesday, May 8, 2012

Nutty Banana Muffins

Alright, I have to admit, I love banana bread with walnuts. I find it to be a perfect snack,  breakfast or dessert. The only problem for me is getting it out of the loaf pan in one piece. That is why I thin k it is great having them in muffin form.  You can of course take the walnuts out of this recipe, but then they wouldn't be nutty muffins which just sounds cute. Or could put chocolate chips in them like my friend Lexy likes, either way you should try this recipe out. Each muffin only has  160 calories.


This makes 12 muffins.

What you Need.

1 cup all purpose flour
3/4 teaspoons Baking soda.
1/4 teaspoon salt
2 Very ripe bananas
1/2 cup brown sugar
6 tbsp butter, melted
1 egg
1 teaspoon vanilla extract
1/4 cup chopped walnuts

How to do it

1. Preheat oven 375F
2.  Either line a muffin pan with the liner or lightly butter and flour one
3. Mix together flour, salt, and baking powder in a small bowl.
4. Mix using a whisk attachment,  one banana with egg, brown sugar, and butter and vanillas until a liquified.
5. Mash the other banana with the nuts
6. Mix flour in with the wet ingredients
7. Fold in banana nut mixture
8. fill each tin about half way. and then tap the tin on a firm surface.
9. Bake fifteen-20 minutes

They are moist and delish! if I do say so myself.


No fuss mini pizzas

Now who does not like pizza? i love pizza! It is great, but ordering pizza can get kinda pricey, and really greasy.  Making pizza dough, well I have done it, and it can be a pain! If it is not done just right is can be a debacle. So, here it is! An easy no fuss pizza!

And as almost all my recipes this is rather low calorie for how much you get. 450 calories 

Now for one personal little pizza here you go.

1 pitta bread round.
1/4 cup  tomato sauce
1/2 cup of cheese ((Mozzarella, but I like cheddar so I used the mexican cheese mix))
All your favorite toppings. ((I went simple with only pepperoni))

Directions:
1. Preheat oven to 325F
2. Put the pita on a cookie sheet.
3. Pour the sauce over the pitta
4.Add half the cheese
5. Add your toppings
6. Add the rest of your cheese
7: put in oven for 8-10 min
8: Broil for 2-4 minutes to crispy crust

See that was easy! And yummy!


Thursday, April 26, 2012

Vegetarian Lasagna

Yes, another vegetarian dish. I am sorry, but I swear I do make food with meat in it often, but with the luck of the draw I just happen to have made these non meat dishes lately. Anywho this dish is very yummy, and you can control the calorie count. I only put a little cheese in it because of my calorie counting parents, but if you couldn't care less, and you love cheese, just load it on!


Ingredients:

1 tbs olive oil
1/2 red bell pepper sliced
1/2 green bell pepper slice
1/2 orange bell pepper slice
5 crimini mushrooms sliced
1/2 yellow onion diced
4 garlic cloves minced
1/2 cup corn
seven lasagna noodles
1 cup cottage cheese ( Riccota works too)
2 eggs 
2 1/2 cups spaghetti sauce 
1 1/4 cup mozzarella cheese, shredded

Directions

1. preheat over to 350F
2.bring a pot to a boil season with salt and add noodles.Once noodles are soft lay out on wax paper  until ready to use.
3. In a pan heal olive oil over medium heat, and then add the bell peppers, onion, mushrooms, and garlic cloves. Saute until onion are slightly browned and bell peppers are soft.
4.add spaghetti sauce and corn to veggies and let stand for ten minutes.
5: Wisk together eggs and cottage cheese
6.  Start layering! Put a little of the veggie sauce mix on the bottom pf a nine by nine and then put a layer of noodles. (Note: Noodles will be a little big so just cut  them to fit in just the bottom))
Then put  a layer of the cheese egg mixture down, and another layer of the veggies and sauce. Then the noodles, and so on and so forth in this pattern making sure to and with the veggies on top.
7. Top with all the cheese! and then cover with aluminum foil, try tenting the top a bit so it doesn't directly touch the cheese.
8.  Put in over for fifteen minutes, and then remove foil and bake another ten minutes or until the cheese is all bubbly.


And then enjoy it!

And in case you forgot what this beauty looked like